Chapter 10–Resolved samples


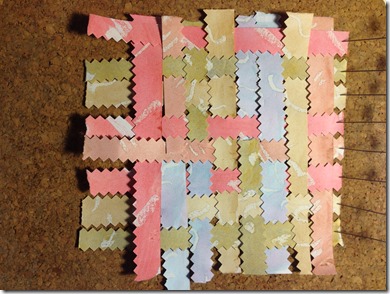
My resolved samples are based on the woven paper design shown in 9.1 in the previous chapter.

Resolved sample 1

This sample was made using a wide variety of threads and wools on a canvas background.    I used coloured watercolour pencils directly onto the canvas to loosely translate the blocks of colour shown in image 9.1 to act as a guide to my choice of thread colours.

I started by covering most of the canvas with basic straight stitches woven in and out of the canvas to create a stitched base.  Once the canvas was almost covered I started building up the height and textures using a wide variety of stitches that I had tested in Chapter 7.  I used a thick cream wool in a detached chain stitch to create the higher areas of the surface.   I particularly liked using French knots and bullion knots in threads and silk ribbons to create height and contours. I used button-hole stitch and stem stitch to help create more organic looking areas which were slightly fossil-like.

I mainly used embroidery cottons and perle threads as I wanted this piece to be vibrant and silky in contrast to the piece I produced in Chapter 7.  See image 10.1 below.

IMG_4065

10.1 – Resolved sample 1

Resolved sample 2

For this sample I decided to use freestyle machine quilting to create a representation of the colours and textures of the woven paper sample.  The base of my piece was cotton wadding.  I used strips made from muslin, wove them and stitched the woven piece to the backing around the perimeter.  I wanted the edges of each strip to fray to help give texture to the piece and so loosened the threads on the edges prior to stitching them in place.   I then machine embroidered using threads to represent the colours in the woven paper sample. I stitched using circular designs as this produces a pleasing difference in heights with the unstitched centres of the circles ‘puffing up’ in contrast to the stitched parts.  See 10.2 below.

IMG_4064

Image 10.2 – Resolved sample 2

Overall, I am very satisfied with these resolved pieces.  I have enjoyed the creative journey that I have taken over the last three months on this foundation course and have produced work which I would not have anticipated creating at the start.  I feel that the pieces are more liberated in their style than I thought I could produce.  I look forward to starting the next module.

Chapter 9–Design exercise

I made five coloured papers – red, rust, sand, olive, blue.  I used a white oil pastel to make a variety of resist marks and then painted over the oil pastel with water colour paint.

For the weaving strips I tried two approaches to making paper strips; cutting with pinking shears and tearing. 

I cut narrow strips with the pinking shears so that I could create a woven piece with a lot of small coloured sections.  See 9.1.

For the torn strips I made wider strips I made one sample with traditional weaving i.e. horizontal and vertical (see 9.2) and one with the strips woven at less regular angles (see 9.3)

IMG_3825

Image 9.1

IMG_3824

Image 9.2

IMG_3826

Image 9.3

Comparing the three samples to my original photograph of the stone wall, I preferred the more organic appearance of the torn strips but think the first sample (9.1) presents a better interpretation of the many changes in colours and texture in my stone wall.

Chapter 8–Colour Stitchery

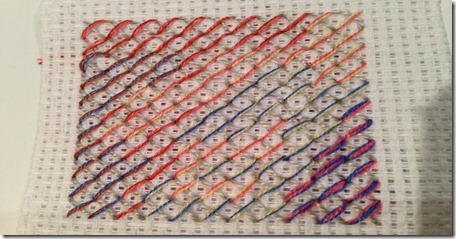
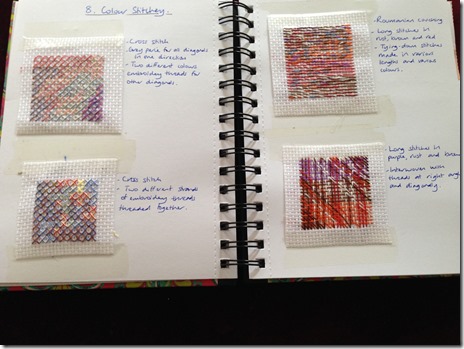
My first sample was made using cross stitch using grey perle thread for all of the diagonals in one direction.  The other diagonals were stitched using two strands of embroidery cotton in different colours.  This technique gave quite a subtle mix of colours which blended together quite well due to the common grey thread running through them.   See 8.1 below.

IMG_3970

Image 8.1

The second sample was also made using cross stitch, but this time using the same colours for both diagonals of the crosses.  Again I used two strands of embroidery cotton in different colours.  This gave a bolder mix of colours than the first sample.  See 8.2 below.

IMG_3969

Image 8.2

The third sample was stitched using Romanian couching.  The horizontal long stitches were made in three different colours to form the base, rust, brown and red.  I then made the tying down stitches in various length and different colours at irregular positions along the long stitches.  This gave an effective result with a wide variety of colours.  See 8.3 below.

IMG_3968

Image 8.3

The fourth sample was made by weaving long stitches horizontally, vertically and diagonally.  I used purple, rust, brown and white threads.  This gave the boldest mix of colours of the four techniques.

IMG_3971

Image 8.4

IMG_3981

Image 8.5 – Sketch book pages